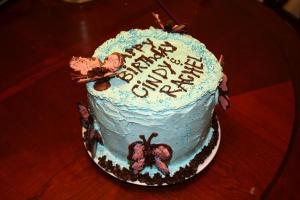
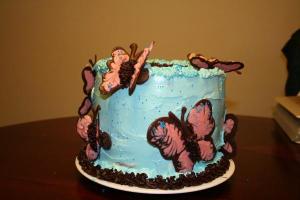
Beautiful Butterfly Cake for my Sister
October 24, 2008
Every year on my sister’s birthday, I attempt to show her that big sisters are the greatest people in the world. Since I was little there have been special events that have marked my sister’s special day. I will concede that the quality of surprise has improved from my “Birthday Haircuts” of elementary years.
For her 21st, she was proposed to by Shrek with a Irish Calladagh ring I ordered straight from Ireland. I was quite surprised that Shrek was so willing but even more surprised that my sister seemed to be contemplating a “Yes” response.
This year she was 24 and wanted to celebrate with a party and a cake. The only perquisite was that all the food including the cake came from my capable hands in the kitchen. Oh and it had to be “girly”. I was attempted for a short moment to exact my revenge with a Hannah Montana cake but couldn’t bring myself to do it.
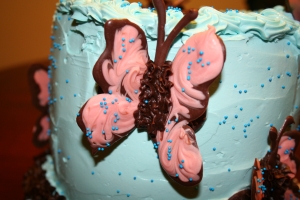
Instead I settled on a 3 layer chocolate peanut butter cake with Swiss butter cream icing and chocolate butterflies. The technique for the butterflies came from the book Hello Cupcake and unfortunately, I do not have pictures of the process. I was too busy controlling the sprinkling techniques of my beautiful cousin. 
The peanut butter parts of the cake were a little dry but I attribute that to the layers living in my freezer for a couple of days.
INGREDIENTS
· 1/2 cup creamy peanut butter
· 1/2 cup butter, softened
· 4 eggs
· 1 (18.25 ounce) package butter cake mix
· 2/3 cup water
DIRECTIONS
1. Preheat oven to 325 degrees F (165 degrees C). Grease and flour two 9 inch round cake pans.
2. Combine 1/2 cup peanut butter and 1/2 cup butter or margarine. Cream until light and fluffy. Add eggs one at time, mixing well after each one. Add cake mix alternately with the water. Stir until just combined. Pour batter into prepared pans.
3. Bake at 325 degrees F (165 degrees C) for 25 minutes or until cake tests done. Allow cakes to cool in pan for 10 minutes and then turn out onto a cooling rack to cool completely.
Chocolate Cake was adapted from Annie’s Eats. I used the cake recipe from her Reese’s Peanut Butter Cake. Unlike the peanut butter cake, the chocolate cake stood up very well to freezing and was delicious.
Chocolate Cake
Ingredients:
For the cake:
2 cups all-purpose flour
½ cup unsweetened cocoa powder
½ tsp. baking powder
½ tsp. baking soda
½ tsp. salt
2 sticks unsalted butter, at room temperature
1 ½ cups sugar
2 large eggs
2 large egg yolks
1 tsp. vanilla extract
1 cup buttermilk
4 oz. bittersweet chocolate, melted and cooled (optional)
Directions:
For the cake, center a rack in the oven and preheat the oven to 350°. Butter two 9×2” round cake pans, dust the insides with flour, tap out the excess and line the bottoms with rounds of parchment paper. Place the pans on a baking sheet.
In a medium bowl, whisk together the flour, cocoa powder, baking powder, baking soda and salt. Set aside.
In a stand mixer fitted with the paddle attachment, beat the butter on medium speed until soft and creamy. Add the sugar and beat for about 2 minutes, until thoroughly blended into the butter. Add the eggs and yolks one at a time, beating for one minute after each addition and scraping down the sides of the bowl as needed. Beat in the vanilla. Reduce the mixer speed to low and add the dry ingredients alternately with the buttermilk; add the dry ingredients in 3 additions and the buttermilk in 2 (beginning and ending with the dry ingredients). Mix each addition only until it is blended into the batter. Scrape down the bowl and add the melted chocolate, if using, folding it in with a spatula. Divide the batter between the prepared cake pans.
Bake for 26-30 minutes or until the cakes feel springy to the touch and start to pull away from the sides of the pans. Transfer to wire racks to cool for about 5 minutes, then run a knife around the sides of the cakes, unmold them and peel off the paper liners. Invert and cool to room temperature right side up.
The recipe for the Swiss Butter Cream from Smitten Kitchen can be found here.
Butterflies
Supplies Needed:
Wax paper
Plastic baggies
Dark cocoa candy melts
Colored candy melts (whatever color you would like the wings to be)
Toothpicks
White nonpareils
Draw your butterfly wing template on a piece of paper. Place on a metal baking sheet. Cut out squares of wax paper large enough to fit pairs of wings, and some smaller ones for antennae.
Place about 1/2 cup of dark cocoa candy melts in a plastic bag, and 1/2 cup of colored candy melts in another plastic bag. Microwave in 10 second intervals, unsealed, massaging the candy melts in between, until the candy is completely melted and no lumps remain. Press out the excess air in the bag and seal. Push the mixture down to one corner of the bag and snip off a very small corner. Trace the outline of the wing template with the dark cocoa melted candy. (Do one wing at a time, outline and colored filling, otherwise it will be too set to swirl by the time you have outlined two wings.)
Use the bag of colored candy melts to fill in the outline. Be generous, so that it will spread all the way to the sides.
Rap the baking sheet against your work surface a few times until the filling and outline spread together.
Use a toothpick to swirl the edges and the filling together slightly.
Sprinkle the top and bottom of each wing with a few white nonpareils.
The melted candy will begin to cool and harden as you work. If it becomes to stiff to work with, microwave for 10 more seconds until melted again. (This step is very important – if you think you might need to reheat the candy, definitely do it. You will save yourself a lot of messed up wings by keeping the candy melted.)
Repeat this process with more candy melts until you have enough sets of wings for all your cupcakes. Let set completely.


That is awesome. Nice job!
Wow sweet.
Cool!